Building a Podcast Studio on Any Budget: What You Need to Sound Professional

Sound quality can make or break a podcast. Listeners might forgive shaky content, but not bad audio. In fact, clear sound makes you seem more credible and keeps people tuned in. A 2018 study called Good Sound, Good Research found that people tend to see speakers with clearer audio as more trustworthy and competent.
The good news is, you don’t need a massive budget to sound professional.
Whether you’re recording in a home office or building out a dedicated space, a clear setup plan can help you achieve high-quality audio on any budget. This guide covers the essential gear, acoustic treatments, lighting setups, and video tools you need to create a professional podcast studio from entry-level kits to full-scale production environments.
Let’s dive in.
P.S.: Want to see exactly what gear the pros are using this year? Check out our Top Podcast Equipment, Gear, and Microphones in 2025
Table of Contents
Microphones
Accessories
Headphones
Audio Interfaces
Podcast Mixers
Recording Software
Camera
Lighting
Budget
Intermediate
Pro
Core Equipment for Podcast Production
These are the essentials that shape your sound. Whether you’re a solo host or managing a full production team, this gear gets the job done at every level.
Microphones
If you get one thing right in your setup, make it the mic. It’s where sound quality starts. Below are options for every level, each with tradeoffs depending on your space, experience, and workflow.
Beginner Microphones
These mics are plug-and-play. No mixer needed. Perfect if you're new to podcasting or recording in an untreated room.
Samson Q2U (USB/XLR Dynamic Microphone)
The Samson Q2U is a top pick for beginners, offering both USB and XLR outputs for flexibility as your setup grows. Its dynamic cardioid design rejects background noise, making it forgiving in untreated rooms. It’s durable, easy to use, and includes essential accessories like a stand and cables, making it a best-value choice for new podcasters.

Specs:
Connectivity: USB & XLR
Type: Dynamic, Cardioid
Frequency Response: 50Hz–15kHz
Max SPL: 148dB
Bit Depth/Sample Rate: Up to 16-bit, 44.1/48kHz
Headphone Output: 1/8" (3.5mm) with level control
Dimensions: 7.5" x 2.2" (190mm x 55mm)
Weight: 0.7lb (0.32kg)
Pricing: ~$70 (standalone), ~$130 (with accessories)
Blue Yeti (USB Condenser Microphone)
The Blue Yeti is a versatile USB condenser mic with multiple polar patterns, ideal for solo or group recordings. It delivers crisp sound but is more sensitive to room noise, so it works best in quieter, treated spaces. Its plug-and-play design is perfect for beginners who want flexibility and ease of use.

Specs:
Connectivity: USB
Type: Condenser, Multi-pattern (Cardioid, Bidirectional, Omnidirectional, Stereo)
Frequency Response: 20Hz–20kHz
Max SPL: 120dB
Bit Rate/Sample Rate: 16-bit, 48kHz
Weight: 0.88kg (mic), 0.5kg (stand)
Pricing: ~$100–$130
How they compare
While the Blue Yeti delivers more detail and flexibility with its multiple patterns, it’s more sensitive to background noise. The Samson Q2U, on the other hand, is simpler and better suited for beginners recording in untreated or noisier spaces.
Mid-Range Microphones
A step up in quality with more control. These often support both USB and XLR and are built for podcasters ready to invest in better audio.
Shure MV7 (USB/XLR Dynamic Microphone)
The Shure MV7 bridges the gap between beginner and pro, offering both USB and XLR outputs. Its dynamic design provides excellent background noise rejection, and the touch panel makes it easy to control levels. It’s ideal for podcasters ready to upgrade but not yet ready to commit to a full XLR setup.

Specs:
Connectivity: USB & XLR
Type: Dynamic, Cardioid
Frequency Response: 50Hz–16kHz
Touch panel for gain, headphone volume, monitoring mix
Built-in headphone output
Pricing: ~$319
Rode NT1-A (XLR Condenser Microphone)
The Rode NT1-A is a studio favorite for its bright, detailed sound and ultra-low self-noise. It’s highly sensitive and best used in treated rooms. The package usually includes a shock mount and pop filter, making it a solid value for serious podcasters.

Specs:
Connectivity: XLR
Type: Large-diaphragm condenser, Cardioid
Frequency Response: 20Hz–20kHz
Sensitivity: 25 mV/Pa
Self-noise: 5dBA (extremely low)
Requires 48V phantom power
Weight: 326g
Pricing: ~$199–$250 (often includes shock mount, pop filter, cable)
How they compare
While the Shure MV7 offers USB/XLR flexibility, onboard controls, and strong noise rejection, the Rode NT1-A delivers more detailed sound and ultra-low self-noise. However, you need a treated room and a full XLR setup.
Pro Microphones
These are what you’ll find in broadcast studios. They sound incredible but require a solid interface or mixer to get the most out of them.
Shure SM7B (XLR Dynamic Microphone)
The SM7B is the industry standard for broadcast and podcast studios, known for its warm, natural sound and exceptional noise rejection. It requires a quality preamp/interface due to low output. Built-in shock isolation and pop filtering make it a professional’s go-to for vocals.

Specs:
Connectivity: XLR
Type: Dynamic, Cardioid
Frequency Response: 50Hz–20kHz
Impedance: 150Ω
Switchable bass roll-off and midrange boost
Internal air-suspension shock isolation
Weight: 851.6g (1.88lbs)
Pricing: ~$439
Electro-Voice RE20 (XLR Dynamic Microphone)
The RE20 is a broadcast legend, offering consistent sound even with off-axis movement. Its Variable-D design minimizes proximity effect, so it’s ideal for voice work in professional studios.

Specs:
Connectivity: XLR
Type: Dynamic, Cardioid
Frequency Response: 45Hz–18kHz
Variable-D technology for consistent sound
Weight: ~737g
Pricing: ~$449
How they compare
While the Shure SM7B is praised for its warm tone and built-in isolation, the Electro-Voice RE20 stands out for its consistent sound with off-axis speaking. That’s, of course, thanks to its Variable-D design and minimal proximity effect.
Accessories
These small pieces of gear make a big difference. They help reduce unwanted noise, improve mic positioning, and keep your setup clean.
Pop Filters
Pop filters are essential for reducing plosives (“p” and “b” sounds). They’re affordable, easy to attach to any stand, and make a noticeable difference in recording quality.
Specs: Double nylon mesh or metallic mesh; 5.5–6” diameter; gooseneck mount with clamp
Pricing: $18.99–$69 (e.g., Nady MPF-6: $19.99)

Boom Arms
Boom arms let you position your mic comfortably and isolate it from desk vibrations. They’re a must for ergonomic, clutter-free setups.
Specs: Telescoping, supports up to 8 lbs, 46–86” extension, 5/8” receiver
Pricing: $20–$80 (RGB Boom Arm, TONOR Adjustable Mic Stand: ~$59.99)

Mic Stands
A solid mic stand keeps your microphone steady and hands-free, so you can stay in frame, sip your coffee, or shuffle papers without hitting the mic. It locks in a consistent distance, boosting sound quality and cuts out handling noise.
Specs: Telescoping, supports up to 4.4 lbs (half extension), 11–15.8” height, standard 3/8” thread with 5/8” adapter, 5 lb weighted base, includes cable clips.
Pricing: $15–$50 (InnoGear Adjustable Desk Microphone Stand: ~$29)

Shock Mounts
Shock mounts prevent vibrations and handling noise from reaching your mic, ensuring cleaner recordings. They’re not just nice-to-haves, they’re increasingly seen as essentials. The global shock mount market was valued at $120 million in 2024 and is projected to hit $200 million by 2033, growing at a 6.2% CAGR from 2026 to 2033. That kind of growth shows just how much creators value clean, professional sound.
Specs: Vary by mic model; typically included with higher-end mics or sold separately
Pricing: $10–$60 (Boseen Microphone Shock Mount Mic Holder: ~$12.95)

Headphones
Good closed-back headphones help you monitor audio in real-time and catch issues before they ruin a recording. Watch this clip to learn more benefits of using them:
Beginner Headphones: Audio-Technica ATH-M20X
The ATH-M20X delivers clear, accurate sound at a budget price, perfect for monitoring and editing. Its closed-back design reduces bleed into your mic.

Specs:
Type: Closed-back, over-ear
Drivers: 40mm
Frequency Response: 15Hz–20kHz
Impedance: 47Ω
Weight: ~190g
Pricing: ~$50
Mid-Range Headphones: Beyerdynamic DT 770 Pro
The DT 770 Pro is a studio staple, offering detailed sound and excellent comfort for long sessions. It has a high impedance, which means more precise monitoring for professional editing and mixing.

Specs:
Type: Closed-back, over-ear
Frequency Response: 5Hz–35kHz
Impedance: 250Ω
SPL: 96dB
Weight: 270g
Pricing: ~$169.99
How they compare
The Audio-Technica ATH-M20X offers clear, reliable sound at an affordable price for beginner monitoring. But the Beyerdynamic DT 770 Pro delivers a broader frequency range, higher impedance, and greater detail. That means it’s better for professional editing and extended studio use.
Audio Interfaces
If you’re using an XLR mic, you’ll need one of these. Interfaces convert analog audio into digital so your computer can record it. They also give you control over gain and input levels.
Behringer UMC22
The UMC22 is an affordable entry-level interface for solo podcasters using XLR mics. It offers reliable performance and basic connectivity.

Specs:
Inputs: 1 XLR/TRS combo, 1 instrument
Outputs: 2 RCA, 1 headphone
Sample Rate: 48kHz
Preamp: Midas-designed
Pricing: ~$40.90
Focusrite Scarlett 2i2
The Scarlett 2i2 is an industry favorite for its clean preamps, low latency, and robust build. It’s ideal for podcasters who want professional quality without complexity.

Specs:
Inputs: 2 XLR/TRS combo
Outputs: 2 balanced 1/4”
Sample Rate: Up to 192kHz, 24-bit
Headphone Output: Yes
USB-powered
Pricing: ~$229
PreSonus AudioBox USB 96
The AudioBox USB 96 is a budget-friendly interface with MIDI support. It’s a versatile choice for podcasters who also work with music production.
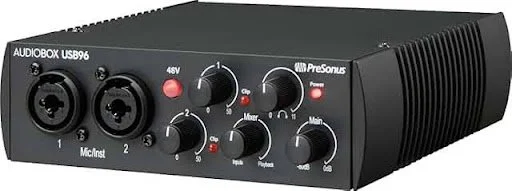
Specs:
Inputs: 2 XLR/TRS combo
Outputs: 2 balanced 1/4”
MIDI I/O: Yes
Sample Rate: 96kHz, 24-bit
USB-powered
Pricing: ~$100
How they compare
The Behringer UMC22 is a simple, budget option for solo setups, offering basic XLR and instrument input. The Focusrite Scarlett 2i2 adds cleaner preamps, dual inputs, and higher resolution for more polished recording. The PreSonus AudioBox USB 96 balances affordability with extra versatility, giving you MIDI support alongside dual inputs and 24-bit audio
Podcast Mixers
Mixers like the Rodecaster Pro combine multiple audio sources, let you record directly, and give you tools like live EQ and sound pads. They’re great if you have multiple guests or want broadcast-level production.
Rode Rodecaster Pro
The Rodecaster Pro is an all-in-one podcast production studio. It supports multiple hosts, remote guests, live sound effects, and onboard processing for polished, broadcast-quality results. It’s intuitive for beginners but powerful enough for pros.

Specs:
Inputs: 4 XLR, USB, smartphone, Bluetooth
Outputs: 4 headphone, stereo line
Sound Pads: 8 programmable (8 banks = 64 sounds)
Onboard Processing: Compressor, noise gate, high-pass filter, APHEX effects
Recording: microSD or computer, stereo/multitrack
Dimensions: 350 x 275 x 82mm
Weight: 1.98kg
Pricing: ~$685
Recording Software
This is where you capture, edit, and polish your episodes. Whether you’re editing with waveforms or text, there’s a tool for every skill level.
Audacity: Free Recording Software for Podcasts
Audacity is a free, open-source DAW perfect for beginners. It offers multitrack recording, editing, and basic effects, making it a solid choice for simple podcast production.

Specs: Windows, Mac, Linux; multitrack editing; basic effects
Pricing: Free
Riverside.fm: Free/Paid Recording Software for Podcasts
Riverside.fm is ideal for remote interviews, offering high-quality local recordings for each participant and easy browser-based access.

Specs: Browser-based; remote recording; up to 4K video (paid); separate audio tracks
Pricing: Free plan (2 hours/month, 720p, 44.1kHz audio); Paid from $15/month
How they compare
Audacity provides a free, open-source entry point for beginners, covering basic multitrack editing and effects. Riverside.fm supports remote interviews with separate track recording and high-resolution options, especially useful for distributed teams.
Descript: Mid-Tier Recording Software for Podcasts
Descript revolutionizes editing by letting you cut audio via the transcript. It’s great for podcasters who want fast, intuitive workflows.

Specs: Text-based editing, AI transcription, multitrack, screen recording
Pricing: $15/month (Creator), $30/month (Pro)
Hindenburg Journalist: Mid-Tier Recording Software for Podcasts
Hindenburg is designed for spoken-word production, with tools like auto-leveling and voice profiling that streamline podcast editing.

Specs: Multitrack, auto-leveling, voice profiler, clipboard/storyboard
Pricing: $95 (Journalist), $375 (Pro)
How they compare
Descript offers a text-based editing approach that simplifies workflows, while Hindenburg focuses on spoken-word production with features tailored for voice.
Adobe Audition: Pro Recording Software for Podcasts
Audition is a professional DAW used in broadcast and post-production, offering deep editing tools and integration with other Adobe apps.

Specs: Multitrack, advanced effects, spectral editing, podcast templates
Pricing: $20/month (Creative Cloud)
Pro Tools: Pro Recording Software for Podcasts
Pro Tools is the industry standard for audio production, with unmatched editing, mixing, and post-production capabilities for large-scale podcasts and studios.

Specs: Up to 512 stereo tracks (Studio), immersive mixing, video support
Pricing: $299/year (Studio), $599/year (Ultimate)
How they compare
While Adobe Audition integrates tightly with other Adobe apps and offers advanced features like spectral editing and podcast templates, Pro Tools stands out for its scalability, immersive mixing, and dominance in large-scale audio production environments. Both support multitrack workflows, but Pro Tools is usually the choice for complex studio setups
This equipment lineup covers every level, ensuring you can build a professional-sounding podcast studio that fits your budget and ambitions.
Treat Your Room: Acoustic Treatment & Soundproofing
Even the best mics and interfaces flop if your recording space is untreated. Hard surfaces bounce sound around, causing echoes, reverb, and muddiness that drown your voice. Acoustic treatments help tame the sound in a room so your recordings come out clean, clear, and professional.
In fact, adding just 17–20% acoustic treatment to a room’s walls can reduce reverberation time to around 0.7 seconds. That’s the sweet spot for clear, professional-sounding recordings.
Treat your room, and that same mic suddenly sounds pro.
Why Good Gear Sounds Bad in Untreated Rooms
Even the best microphones and interfaces can’t compensate for poor room acoustics. In an untreated space, hard surfaces like walls, ceilings, and floors reflect sound waves, causing echoes, reverb, and “roominess” that muddy your recordings. Early reflections and standing waves distort your voice, making speech less clear and professional. The result? Listeners hear more of your room than your message, and your audio may sound hollow, boomy, or harsh, no matter how much you spend on gear.
“The difference between an untreated and a well-treated room is often night and day. You’ll hear improved clarity, tighter bass, and a reduction in listening fatigue.”
( Autosound New Zealand, The Impact of Room Acoustics on Sound Quality)
How to Build DIY Acoustic Panels with Rockwool (~$30 Each)
You don’t need to break the bank to treat your space. DIY acoustic panels are highly effective and affordable:
Materials:
Rockwool insulation (e.g., SAFE’n’SOUND)
1x4 or 2x4 lumber for frames
Breathable fabric (test by blowing air through it)
Screws, staples, and basic tools
Steps:
Build a wooden frame (e.g., 48"x16" or 24"x48").
Insert a slab of Rockwool insulation.
Staple weed cloth or breathable fabric to the back.
Wrap the panel in fabric and staple securely.
Mount panels at reflection points on walls and, if possible, hang a few as ceiling “clouds”.
DIY panels can be made for about $30 each, compared to $100+ for commercial options, and will dramatically reduce echo and reverb in your recordings.
Budget Soundproofing Tools
Acoustic caulk: Seal gaps around doors, windows, and baseboards to prevent sound leaks. Flexible and easy to apply, it’s a cheap way to block noise transmission.
Moving blankets: Hang heavy moving blankets on walls, doors, or over windows. They absorb reflections and dampen sound for around $10–$20 each-much cheaper than foam panels.
Mass Loaded Vinyl (MLV): A dense, flexible barrier that blocks sound transmission through walls, doors, or floors. Install behind drywall or hang as a curtain for effective noise reduction.
These tools are affordable, easy to install, and can make a noticeable difference in both soundproofing and acoustic treatment.
Pro Solutions: Echo Wall Panels & Isolation Booths
Echo wall panels: High-performance, fabric-wrapped panels designed to absorb a wide range of frequencies. They offer superior echo reduction and a polished studio look, ideal for permanent setups.
Isolation booths: Fully enclosed booths with integrated acoustic treatment provide maximum isolation from external noise and control internal reflections. They’re portable, require no permanent installation, and deliver a “dry” recording environment for the most professional results.
Video Podcasting Setup: Cameras and Lighting
If you're turning your podcast into a video show, visual quality matters as much as audio. Whether you’re using a webcam or a cinema-grade camera, good lighting and smart framing can make a massive difference in how professional your content feels.
Cameras
Not all cameras are created equal. These options are grouped by budget and use case, from solo creators to full-scale productions.
Beginner
Simple plug-and-play options like webcams or smartphones with software overlays. Good enough to get started without a steep learning curve.
Logitech C920 (USB Webcam)
The Logitech C920 remains a top choice for beginner podcasters and streamers, offering crisp 1080p video, fast autofocus, and dual stereo mics. Its performance is best with good lighting, making it ideal for home studios and remote interviews. The 78° field of view is perfect for single or dual-person framing, and its compatibility with most video platforms makes setup easy.

Specs:
Resolution: Full HD 1080p at 30fps, 720p at 30fps
Lens: Full HD glass, 78° diagonal field of view
Focus: Autofocus
Microphones: Dual stereo mics (range up to 1m)
Features: HD light correction (RightLight 2), tripod mountable
Pricing: $50–$80
Smartphone with Camo or Riverside Mobile
Using your smartphone with apps like Camo turns it into a high-quality webcam, often surpassing standard webcams in resolution and dynamic range. This is a cost-effective way to get sharp video for podcasts, especially if you already own a modern phone. Mounting your phone on a tripod is recommended for stability.

Smartphone with Riverside Mobile
With Riverside, turning your phone into a high-quality webcam is simple and pro-level. Just install the Riverside app, connect your phone to your computer (or use Wi-Fi), and it’ll stream crisp, high-res video straight from your phone’s camera. It’s perfect for podcasters and creators who want studio-quality visuals without extra gear. Mount your phone on a tripod, plug it in to stay powered, and you’re ready to roll.
Specs:
Resolution: Up to 4K (device-dependent)
Connectivity: USB or Wi-Fi (Camo app), browser-based (Riverside)
Features: Use front or rear camera, app-based controls, works with Mac/PC
Pricing: Free (Camo basic), $5–$10/month (Camo Pro), Riverside Mobile included with Riverside.fm
Mid-Range
Mirrorless and compact cameras with great autofocus and shallow depth of field. These give you that cinematic look without a massive rig.
Sony ZV-1 (Compact Camera)
The Sony ZV-1 is purpose-built for content creators, with excellent autofocus, a bright lens for background blur, and 4K video. It’s compact, lightweight, and offers features like a built-in ND filter and Product Showcase mode. The 3.5mm mic input and hotshoe make it easy to upgrade your audio setup.

Specs:
Sensor: 20.1MP 1" BSI CMOS
Lens: 24-70mm f/1.8-2.8 Zeiss
Video: 4K (24/25/30fps), 1080p (up to 120fps)
Autofocus: Real-time Eye AF, 315 phase-detect points
Audio: 3.5mm mic input, hotshoe, built-in 3-capsule mic
Weight: 294g
Pricing: $500–$750
Canon EOS M50 Mark II (Mirrorless)
The M50 Mark II is a versatile mirrorless camera with a large sensor for shallow depth of field and strong low-light performance. Its flip-out screen is ideal for solo podcasters, while HDMI output and mic input make it easy to integrate into a professional setup.

Specs:
Sensor: 24.1MP APS-C CMOS (22.3 x 14.9mm)
Lens Mount: EF-M (compatible via adapter)
Video: 4K (24fps), 1080p (up to 60fps)
Autofocus: Dual Pixel AF (1080p), Eye Detection
Screen: Vari-angle touchscreen
Connectivity: HDMI, microphone input, Wi-Fi
Pricing: $999.16 (body only)
Pro
Full-frame and cinema cameras are built for serious content creation. Perfect for brands that want polished, high-production-value video. In fact, 87% of consumers say video quality directly influences their trust in a brand. So when your visuals look polished and professional, your audience is more likely to take you seriously.
Sony FX3 (Full-Frame Cinema Camera)
The Sony FX3 is a professional cinema camera designed for high-end podcast video production. It delivers superb low-light performance, advanced autofocus, and pro audio inputs, making it a favorite for studios seeking cinematic quality and flexibility.

Specs:
Sensor: 12.1MP Full-Frame Exmor R CMOS
Video: 4K up to 120fps, 1080p up to 240fps
Color: 10-bit 4:2:2, S-Log3, S-Cinetone, 15+ stops dynamic range
Audio: Detachable XLR handle, dual XLR/TRS inputs, 3.5mm jack
Stabilization: 5-axis in-body IS
Build: Compact, cage-free, weather-sealed
Pricing: $3,700–$4,000 (body only)
Essential Accessories
To make the most of mid- to pro-level cameras, you’ll need an HDMI capture card like the Elgato Cam Link. It turns your DSLR or mirrorless camera into a plug-and-play webcam.
Elgato Cam Link 4K (HDMI-to-USB Video Capture)
The Cam Link 4K lets you use DSLR, mirrorless, or cinema cameras as webcams, unlocking the highest possible video quality for live streaming or recording. It’s plug-and-play and supports up to 4K30 video input.

Specs:
Input: HDMI (unencrypted)
Output: USB 3.0
Supported Resolutions: 480p/576p/720p/1080i/1080p (up to 60fps), 2160p (up to 30fps)
Compatibility: Works with OBS, Zoom, Teams, and more
Pricing: $100–$130
Lighting
Even the best camera looks bad with poor lighting. Good lighting doesn’t have to be expensive, but it should be consistent and flattering. In fact, Wistia found that videos with professional lighting had a 68% engagement rate, compared to just 36% for poorly lit ones. Investing in good lighting saves you editing headaches and gives your content real credibility.
Budget
Ring lights and natural light setups work well when placed correctly. Great for early-stage setups or portable use.
Natural Light
Positioning yourself near a window provides soft, flattering light for video. Best results are achieved with indirect sunlight to avoid harsh shadows. On the downside, some creators don’t consider natural light very reliable for high-quality videos:
Specs: N/A
Pricing: Free
Neewer 10” Ring Light
This affordable ring light provides even, shadow-free illumination, ideal for single-person setups. Adjustable color temperature and brightness help match ambient light or set a mood.

Specs:
Power: 20W, 168 LEDs (bi-color: warm/cool)
Brightness: 0–100% adjustable
Color Temp: 2900–7000K
CRI: 97+
Mount: Phone holder, tripod included
Pricing: $30–$50
Mid-Range
Softboxes and LED panel lights offer more control over brightness and shadows. Ideal for semi-permanent desk or room setups.
Neewer Softbox Kits
Softbox kits diffuse light for a natural, professional look, reducing harsh shadows and providing broad coverage for multi-person podcasts.

Specs:
Size: 24"x24" (60x60cm) nylon softboxes
Bulb: 26W RGB LED, 2700K–6500K, CRI 93+
Stand: Adjustable, up to 7ft
App control: Available on some models
Pricing: $100–$200 (per kit)
Neewer 660 LED Panels
LED panels offer powerful, adjustable lighting with high color accuracy. They’re ideal for larger sets or multi-host video podcasts, and can be battery- or AC-powered.

Specs:
LEDs: 660 (330 white, 330 yellow)
Power: 45W
Color Temp: 3200–5600K, adjustable
CRI: 96+
Control: Remote, dimmable
Stands: Included
Pricing: $180–$250 (2-light kit)
Pro
Studio lighting kits from Aputure or Godox give you full control over color temperature, diffusion, and output. These setups are great for teams shooting multiple angles or working in different environments.
Aputure Light Storm LS C120D II
The Aputure Light Storm series delivers studio-grade lighting with exceptional color accuracy and output. It’s quiet, durable, and compatible with a wide range of modifiers for ultimate control.

Specs:
Power: 180W, 5500K daylight
Output: 135,000 lux @ 1.6’ with Fresnel
CRI/TLCI: 96/97
Control: Wireless remote, DMX
Build: All-aluminum, Bowens mount
Pricing: $749–$1,200 (per kit)
Godox SL60W
The Godox SL60W is a favorite among creators for its high color accuracy and soft, powerful output. It’s a cost-effective alternative to more expensive pro lights, great for podcast studios seeking a cinematic look.

Specs:
Power: 60W, 5600K daylight
Output: 4100 lux @ 1m
CRI: >93, TLCI: >95
Brightness: 10–100% adjustable
Weight: 1.6kg
Pricing: $150–$250
This lineup ensures you can achieve professional video and lighting quality, whether you’re just starting out or building a high-end podcast studio.
B2B Podcast Studio Decoration
Your recording space says a lot about your brand. Clean, intentional decor like a modern desk, ergonomic chair, neatly placed books, greenery, or branded visuals sets a professional tone and builds trust with your audience. A polished, uncluttered background supports your message without distraction and helps elevate your content in the eyes of clients, partners, and decision-makers.
P.S.: Need more inspiration for creating a studio look that’s sleek, credible, and ready for business? This clip helps you get started, but we’ve summed up the most important factors for you below.
Brand Identity Through Visuals
Use your background to subtly reflect your brand. That could mean placing a small logo plaque, using your brand’s primary color in accents or lighting, or incorporating visual cues that match your industry (e.g., tech hardware, design books, legal volumes). Avoid making it feel staged, though.
Ergonomics and Furniture Matter
Your setup should look comfortable and competent. A quality desk and ergonomic chair signal professionalism, especially on video calls or interviews. Avoid flashy gamer chairs or wobbly folding tables because they kill the vibe instantly.
Minimalism with Personality
Decluttered doesn’t mean sterile. Add subtle touches like greenery, neatly stacked books, or a single framed print to keep the space from looking empty. Just avoid anything overly decorative or chaotic that might pull focus.
Lighting That Flatters
Lighting shapes perception. Soft, indirect lighting from multiple angles prevents harsh shadows and highlights your face evenly. Bonus points for warm light tones; they feel more inviting. Avoid fluorescent overheads or single-source ring lights that scream “home office.”
Acoustic Treatment for Polish
Even a beautifully decorated room falls apart with bad audio. Add acoustic panels, rugs, and foam to tame echo and reverb. These can be styled to match your space (fabric-wrapped panels, color-coordinated foams) so they blend into the design without looking techy.
Background Symmetry and Framing
Camera framing should feel balanced. Position yourself so there’s clean space on either side, preferably with subtle visual anchors like a plant or a bookshelf. Make sure you’re centered and avoid awkward angles that skew perspective.
Take this example.

We know this is a professional podcast with nearly 3 million views, but even as beginners, we can learn a lot by studying setups like this.
What stands out here isn’t flashy gear or a big production budget. It’s the fundamentals done right. The symmetry between host and guest creates visual balance, the large window adds natural depth and soft backlighting, and the furniture is simple but intentional.
The space feels open, modern, and calm. There’s no visual noise and no branding overload. Everything from mic placement to camera framing is deliberate, and it shows. Even the industrial brick walls and wood tones contribute to a grounded, trustworthy vibe.
Of course, don’t try to copy every detail. The goal is understanding why the setup works and applying that clarity and intentionality at any scale.
Podcast Studio Setup Cost: Options for Every Budget
Here’s how all the gear fits together. These tiered setups show what you can build based on your available budget.

Final Recommendations
Before upgrading to a fancy mic, make sure your room sounds good. A $300 mic in an echo-filled office still sounds bad. Prioritize basic acoustic treatment before sinking more money into hardware.
Start simple. USB mics like the Samson Q2U or Shure MV7 deliver excellent results and give you the flexibility to grow. When you’re ready for more control, move up to XLR and a proper interface.
Use free tools like Audacity or Riverside.fm until you hit real bottlenecks. You don’t need Adobe Audition or Pro Tools on day one. Scale your tech stack when your workflow demands it not before.
Most importantly, match your gear to your actual goals. If your podcast is for brand storytelling and relationship-building, clean audio and consistent publishing matter more than flashy video rigs or broadcast studios.
With the right plan, you can build a studio that sounds professional at any budget.
Need Help Producing Your Podcast?
At Content Allies, we help B2B companies drive revenue through podcasting. We handle everything; strategy, production, editing, and promotion, so all you need to do is show up and host.
Whether you're starting from scratch or scaling an existing show, we provide full-service support without requiring you to invest in equipment or build an internal team.
From pre-show planning to post-show marketing, we turn podcasts into high-impact content engines.
Check out the companies we've helped, then reach out to see how we can help you launch or grow a podcast that delivers real business results.
FAQ
How to do a podcast on a budget?
Start by focusing on the essentials: a good-quality USB microphone (like the Samson Q2U), free recording software (such as Audacity or Riverside.fm’s free tier), and basic acoustic treatment like moving blankets or DIY panels. Keep your setup minimal but functional. Use a quiet room with soft furnishings to reduce echo, and skip expensive mixers or interfaces until your workflow demands them.
You can build a reliable podcast setup for under $150, and gradually upgrade gear as your show grows. Prioritize clean audio, consistent content, and smart planning over flashy equipment.
How to start a podcast with no budget?
You can absolutely start a podcast for free or very close to it. Here’s how:
Use your smartphone with a built-in mic or earbuds to record.
Record with free tools like Audacity or Anchor (which also handles hosting).
Record in a soft room such as closets, bedrooms, or anywhere with carpets and curtains to control reverb.
Edit yourself using free DAWs or apps like Descript (which offers a free plan).
While the quality might not be studio-level on day one, consistency and clarity go a long way. As your audience grows, reinvest into gear that lifts your production quality.
How much money do you need to start a podcast?
It depends on your goals, but here’s a quick breakdown:
Zero to $100: Use a smartphone or basic headset mic, record in a quiet room, and edit with free software.
$150 to $300: Upgrade to a USB mic (like Shure MV7 or Samson Q2U), use foam panels or DIY acoustic treatment, and add a pop filter and boom arm.
$500 and up: Add an audio interface, better headphones, lighting (if doing video), and mid-tier editing tools like Descript or Hindenburg.
For most solo creators or small teams, $200 to $300 is the sweet spot to sound professional from the start.


